Hands-on 02: Visual Studio Code
Visual Studio Code - VS Code in short - has emerged as a popular environment that many programmers have come to adopt, whatever programming language they use. In the past, SAS users have created homebrew extensions to bring the SAS language into VS Code. In 2022, SAS released the official SAS Extension for Visual Studio Code. The extension is available for use with any modern SAS environment, including SAS Viya and SAS 9.4. With the SAS extension, VS Code offers full syntax completion, coloring, integrated help, and more.
Access VS Code and Sign in to SAS Viya
-
Open Visual Studio Code

-
For this workshop, the SAS Extension has already been installed for you. You can open it by clicking the SAS icon in the left menu bar

TIP: In your own environment, if you already have VS Code, installing the SAS Extension is as easy as pressing Ctrl+Shift+X to open the list of extensions, and searching for “SAS” in the Marketplace. Be sure to select the “official SAS Extension” (complete with the blue checkmark!).

-
To fully use the extension you have to sign in to a SAS environment. While it’s possible to immediately start coding and enjoy the extension assistance even when disconnected, it’s not possible to run your code without a live connection to a SAS environment. Select the Sign-In button:
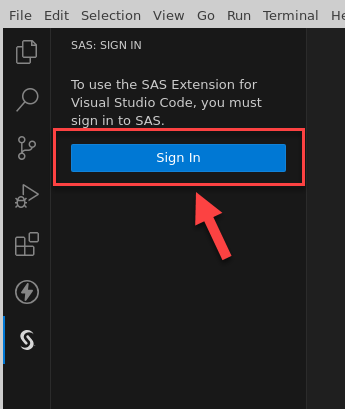
-
You will get a warning message that “The extension SAS wants to sign in using SAS”. Click the Allow button, and VS Code will automatically open a tab in your default web browser showing a SASLogon window asking for user credentials. Since you already signed into SAS Viya from SAS Studio in a previous exercise, you do not have to sign in again. The SAS Logon page recognizes your previous session and gives you an Authorization Code that you can copy and paste into VS Code. Copy the code from the Google Chrome window (select it and press CTRL+C)
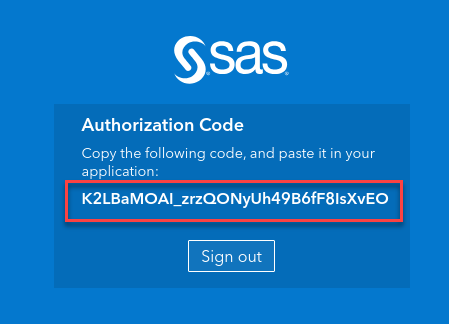
Pay attention to NOT press the Sign out button, or you will destroy your session and invalidate the code. After copying the code, simply close the browser tab.
If your previous session is expired or you signed out, you will be presented with a normal web sign in form. Just accept the pre-filled student username and password and sign-in form.
-
Back in the VS Code window, you’ll find an empty text box at the top, waiting for you to fill in the Authorization Code. Paste the code in the box (press CTRL+V), then press Enter.
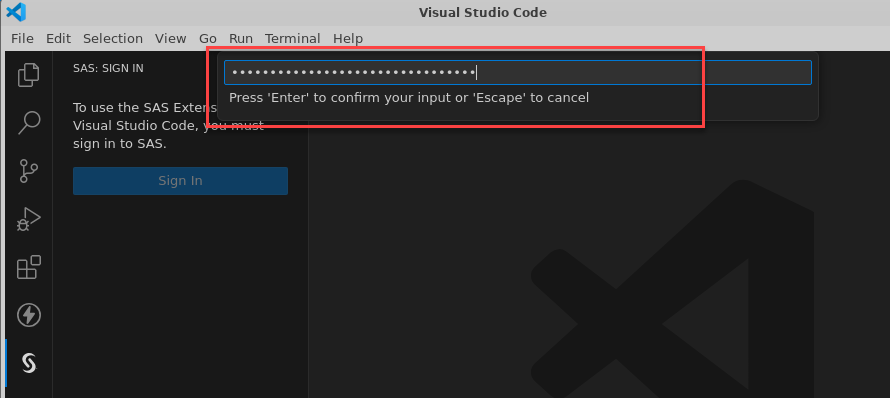
If you do not see the text box where to paste the Authorization Code, you may inadvertently have opened a new instance instead of going back to your existing one. The current VS Code window may be hidden behind the the Google Chrome window. You can bring it to the front by selecting it in the Applications bar at the top of the desktop:

-
VS Code should display some SAS panes while attempting to connect to SAS Viya with the Authorization Code you provided. This should last no more than 30 seconds:
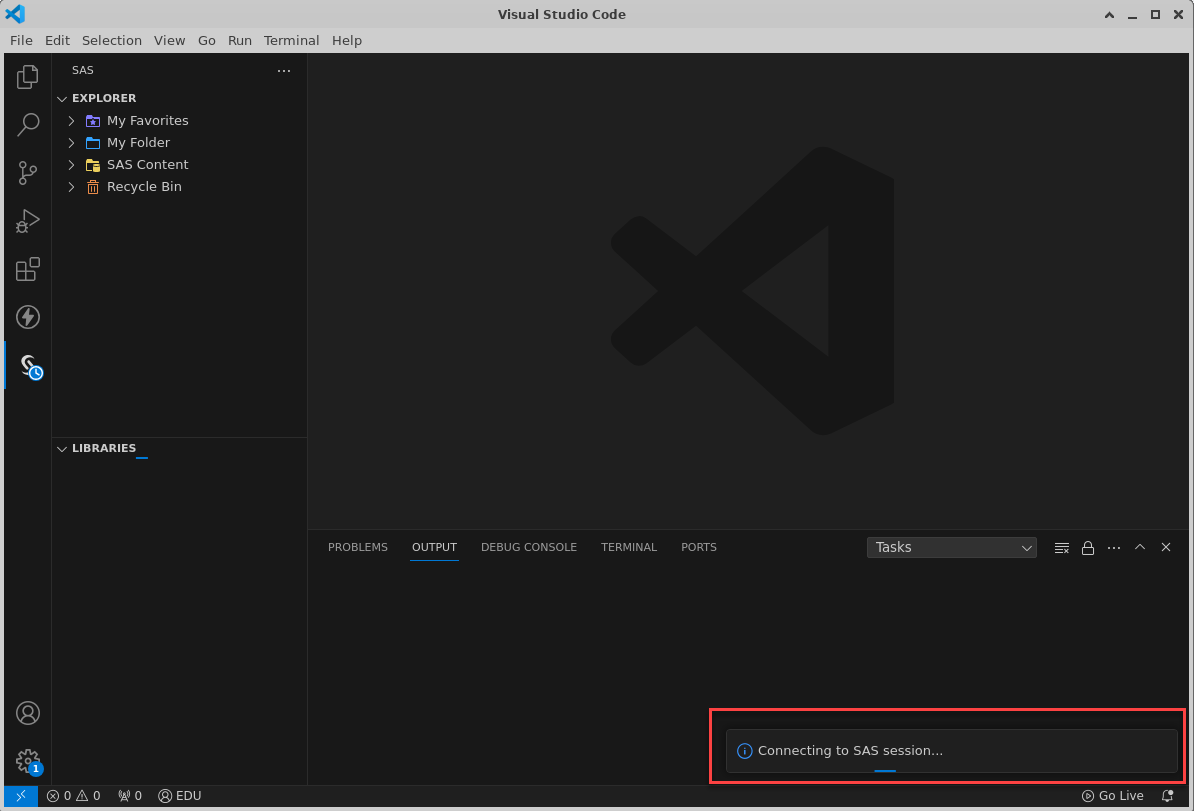
-
When a SAS compute session is available in the backend, VS Code will show the SAS initialization log in the Output pane, and list of libraries available to use in the Libraries pane:
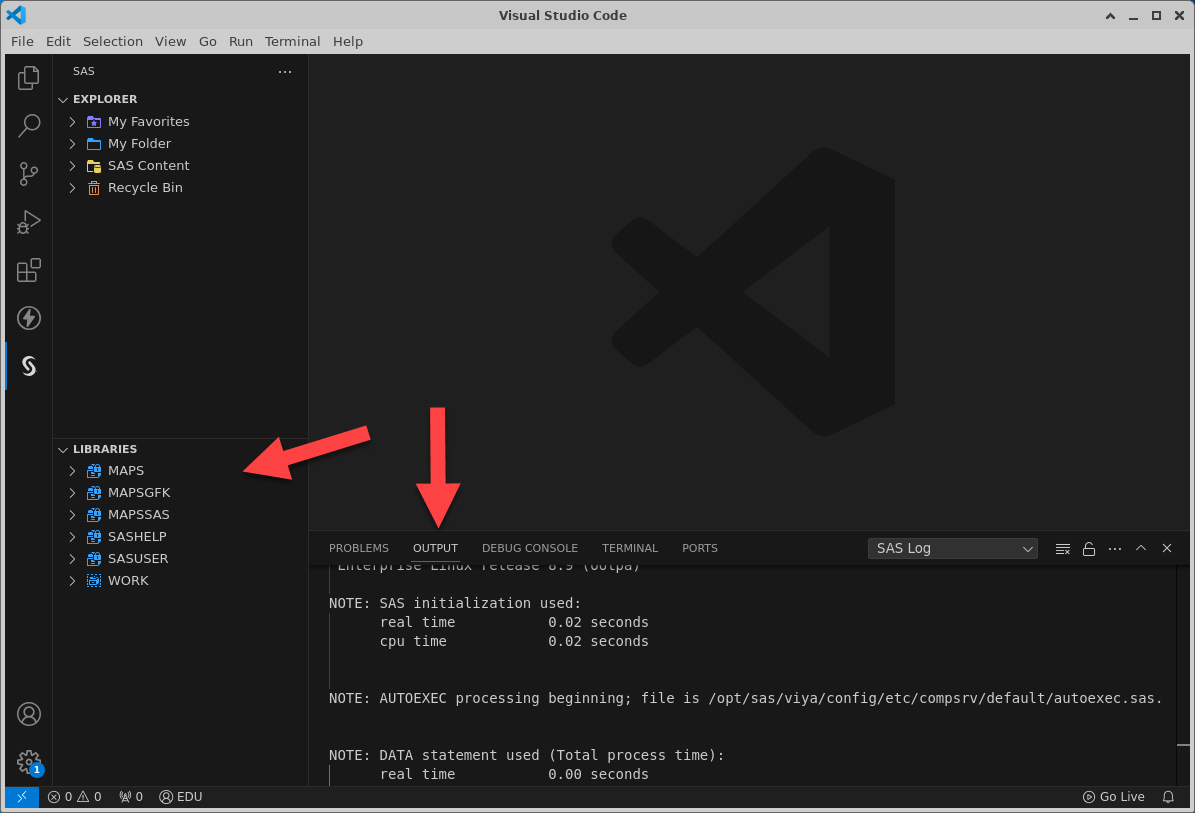
Congratulations, you are now ready to use VS Code to harness your SAS Viya environment!
Familiarize with the SAS extension
The first thing we want to do it to make VS Code feel more at home with SAS. Let’s apply one of the available SAS themes.
-
Navigate to File > Preferences > Theme > Color Theme, then choose one of three SAS themes: SAS Light, SAS Dark, SAS High Contrast.

I personally like dark themes, so I’ll go with SAS Dark

Notice how the general appearance of VS Code changes.
Now that the appearance is set, let’s browse around a bit.
-
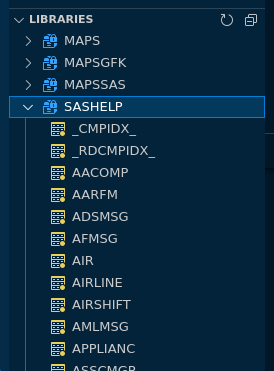
Navigate to the Libraries pane and expand the SASHELP library
-
Scroll down to find and click on the CARS table. A new table viewer window will appears to let you browse the table. This view is read-only, so there is no risk to inadvertently change your data.

-
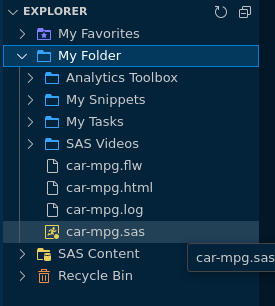
Close the table viewer, then navigate to the explorer pane. You may notice how similar this is to the corresponding pane in SAS Studio. Expand My Folder and click car-mpg.sas to open the program you wrote in the previous exercise within SAS Studio.
-
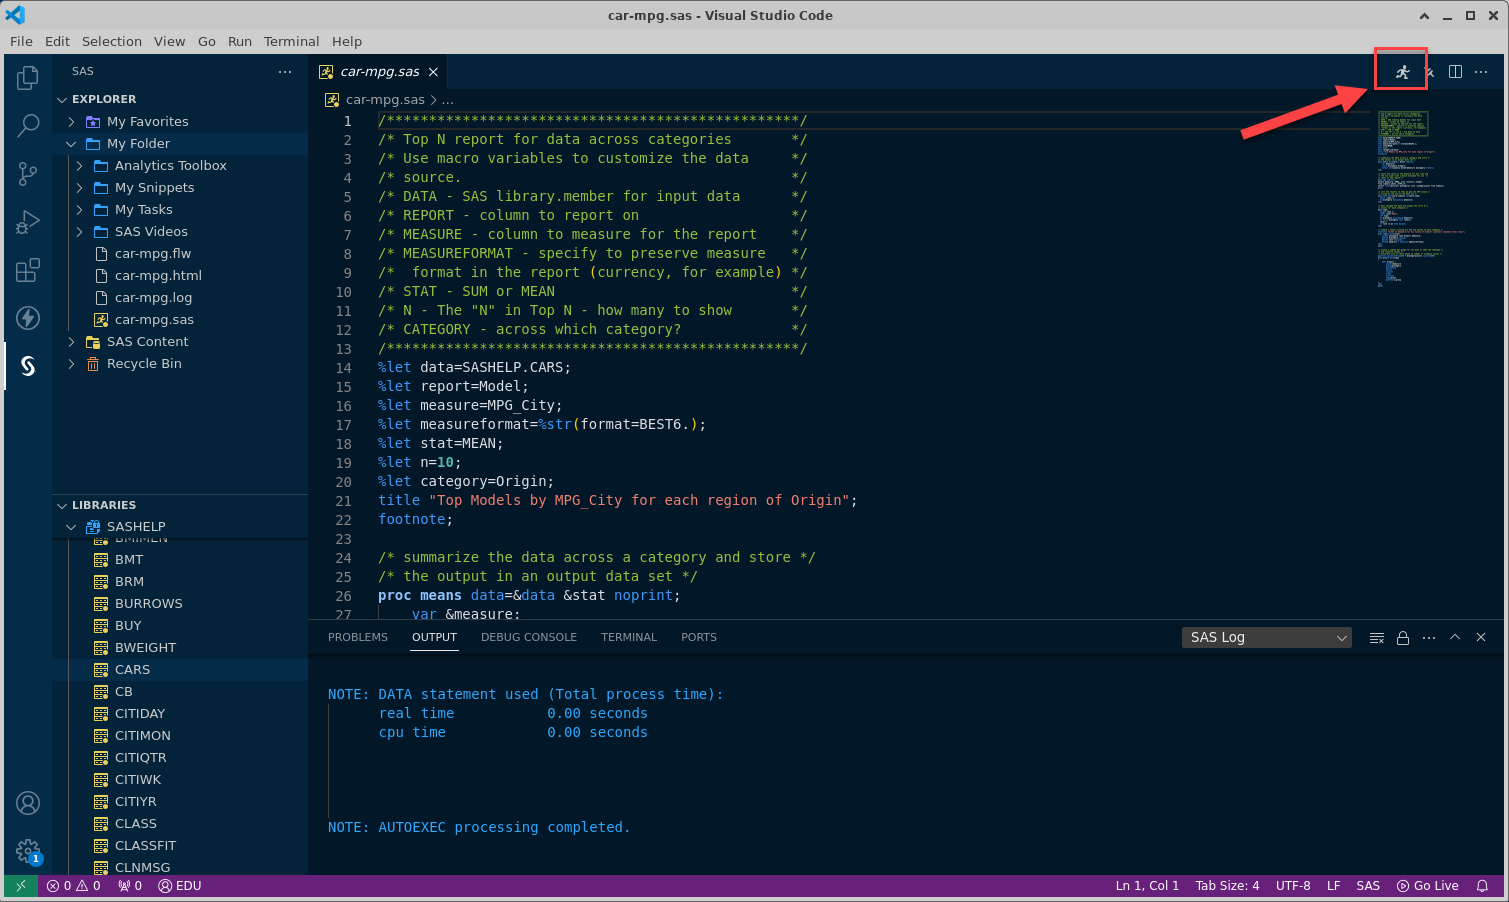
Click the Running Man icon at the top right of the car-mpg.sas code window. This will submit and execute the program on SAS Viya.
-
In the Results tab you can recognize the output of the program: a table and a horizontal bar chart.

scroll down to see the bar chart
The pane at the bottom shows the SAS log, where you can read execution details, warnings and errors.
-
Click anywhere in the program window to bring it into focus, then hover the mouse over a keyword, for example the LEVEL option in the OUTPUT statement of PROC MEANS. A contextual help window appears and explains the usage in the correct context:

This was a quick tour, enough to show how familiar VS Code can be if you are used to SAS Studio. Time to discover something different!
Close the program and the results window in the top pane, and close the output windows in the bottom pane.
Create and run a SAS Notebook
The SAS extension supports a special file type called “SAS notebooks.” These work just like Python notebooks that you might have used in Jupyter or other environments. Notebooks allow you to mix code with documentation and results, encapsulating a work product that is easy to understand and demonstrate. Let’s create and experiment with a simple SAS notebook.
-
In the Explorer pane, right click on My Folder and select “New File”. Enter the name “Innovate24.sasnb”, and press Enter to confirm.

-
VS Code will open a new SAS Notebook. With Notebooks, you organize and structure everything in cells, and you run individual cells one after another. SAS Notebooks support 4 different types of cells: Markdown (documentation), SAS (code), Python (code), and SQL (code). As a good practice, we want to start this notebook with some introductory text.
Click the + Markdown button to create a new markdown cell:

Note: if there is already a cell marked as SAS (look at the lower right corner of the cell), you can safely delete it.
-
Enter the following text in the markdown cell, then press Shift+Enter to save it:
# SAS Innovate 2024 VS Code Hands-on ## Let's get started with running SAS Code You can run any SAS proc, macro or data step code. Let us start of with some simple code and take a look at the SAS log. -
VS Code automatically moves to the next cell beneath the current one. If you are at the end of the file, it creates a new cell for you. Enter the following code:
proc sort data=sashelp.cars out=work.cars_sorted;
    by origin;
run;

%put 'Hello World from SAS Notebook';
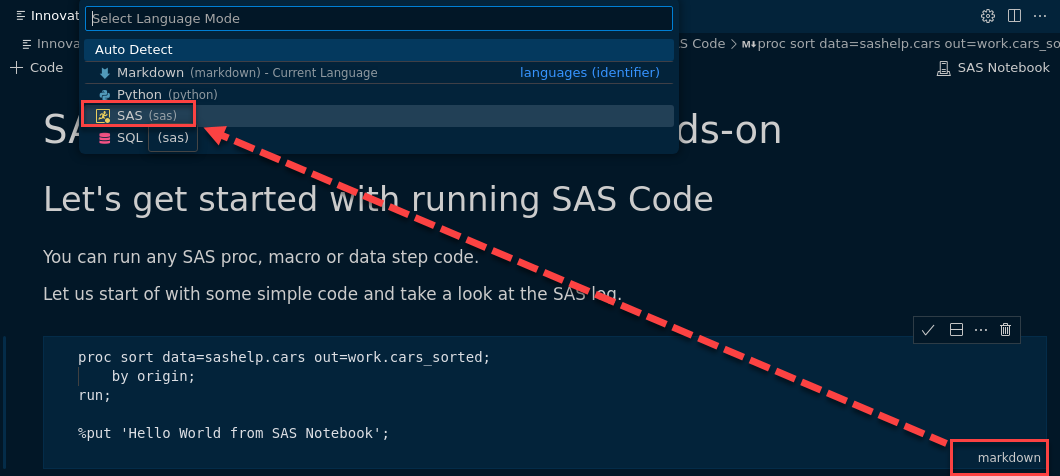
Notice how the text does not get color-coded as SAS code! Something is not right. In fact, if you look at the label at the bottom right of the cell, it states “markdown”, just as the previous cell.
-
Click on the markdown label at the bottom right of the cell to open the “Select Language Mode” drop-down list and change it to SAS.
-
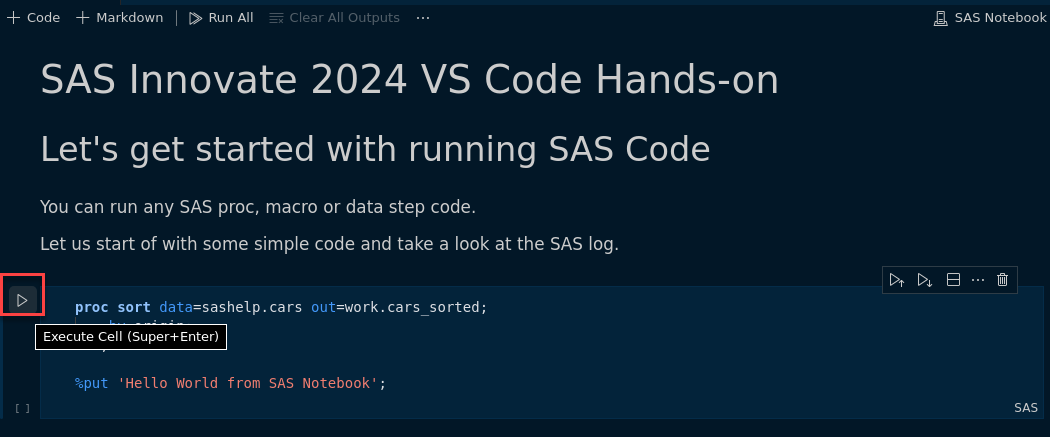
You can click Shift+Enter as before to execute the SAS code in the cell, or press the triangle icon to the left of the cell.
-
The cell may remain “pending” for a few seconds, then the code is submitted to SAS Viya and the results are sent back to VS Code to be displayed beneath the cell. In this case, since there is no output, the log gets displayed:

-
Next, let’s explore how you can mix cells with different languages in the same SAS Notebook. Add 2 more cells at the bottom by selecting the “+ Code” button twice

-
Both new cells gets created with the SAS language mode. Click on the SAS label at the bottom right of each to open the “Select Language Mode” drop down and change them. Select SQL for the first cell, and Python for the second one.

-
Paste the following code in the SQL cell and execute it:
select * from work.cars_sorted(obs=5)
-
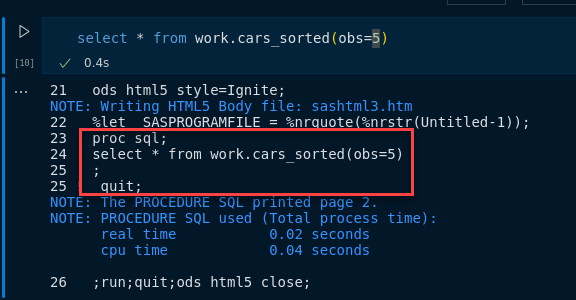
Behind the scenes, VS Code wraps your SQL code in PROC SQL before submitting it. You can check this by switching what is presented after the SQL cell from the results to the log. Select the “...” icon to the left of the SQL results, then select “Change Presentation”, and “SAS Log Renderer”
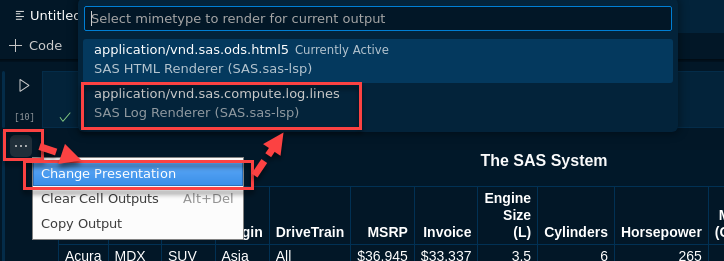
Notice in the log how the SQL code is wrapped within a “proc sql;” opener and a “quit;” closing line:
-
Let’s move to the last cell. Paste the following code in the Python cell and execute it. Just as with the SQL cell, the code is implicitly wrapped: this time the code is wrapped in PROC PYTHON.
import matplotlib.pyplot as plt
df = SAS.sd2df('work.cars_sorted')
ax = plt.bar(df['Origin'], df['MSRP'])
SAS.pyplot(plt)
Since you just swapped the presentation type to show the SAS log, the python cell will now output the SAS log by default. Change it back to see the results:


-
Save the SAS notebook by pressing CTRL+S.
Congratulations, you have almost reached the end of the current exercise. In this hands-on you have explored the SAS Extension for Visual Studio Code, learning how to display data in SAS Viya, run SAS programs, and leverage SAS Notebooks to integrate SAS, SQL, Python code and inline documentation in a seamless execution environment.
But wait, there is more! What if I tell you that you can circle back from VS Code to SAS Studio?
-
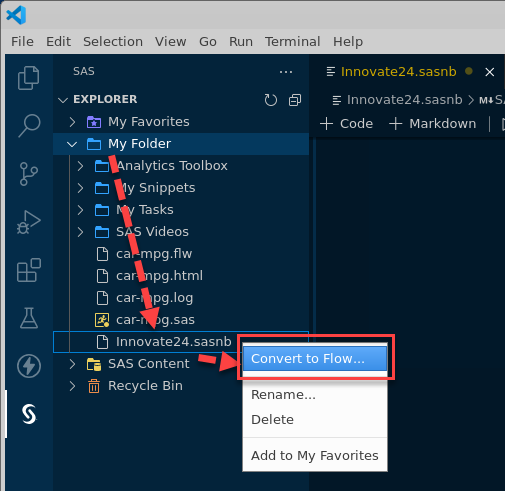
In the explorer pane, expand “My Folder”, right click on the “Innovate24.sasnb” file and select “Convert to Flow...”. Press “Enter” to accept the default filename.
-
Open the Chrome browser and sign back in into SAS Studio.
-
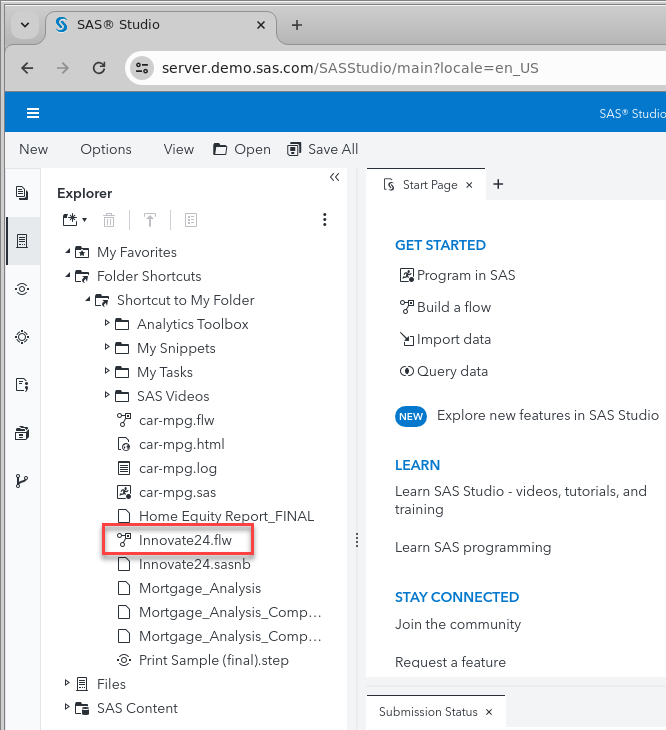
In the Explorer pane, navigate to “Folder Shortcuts” > “Shortcut to My Folder” and double-click on the “Innovate24.flw” file to open it.
-
In the SAS Studio flow that was automatically generated by VS Code you can recognize the 3 code cells you created in the SAS Notebook: the first with the SAS code, the second with the SQL code, and the third with the Python code. You may have to rearrange the pane size to see them all. Click on the “Python Program” node, you should recognize the code you entered.
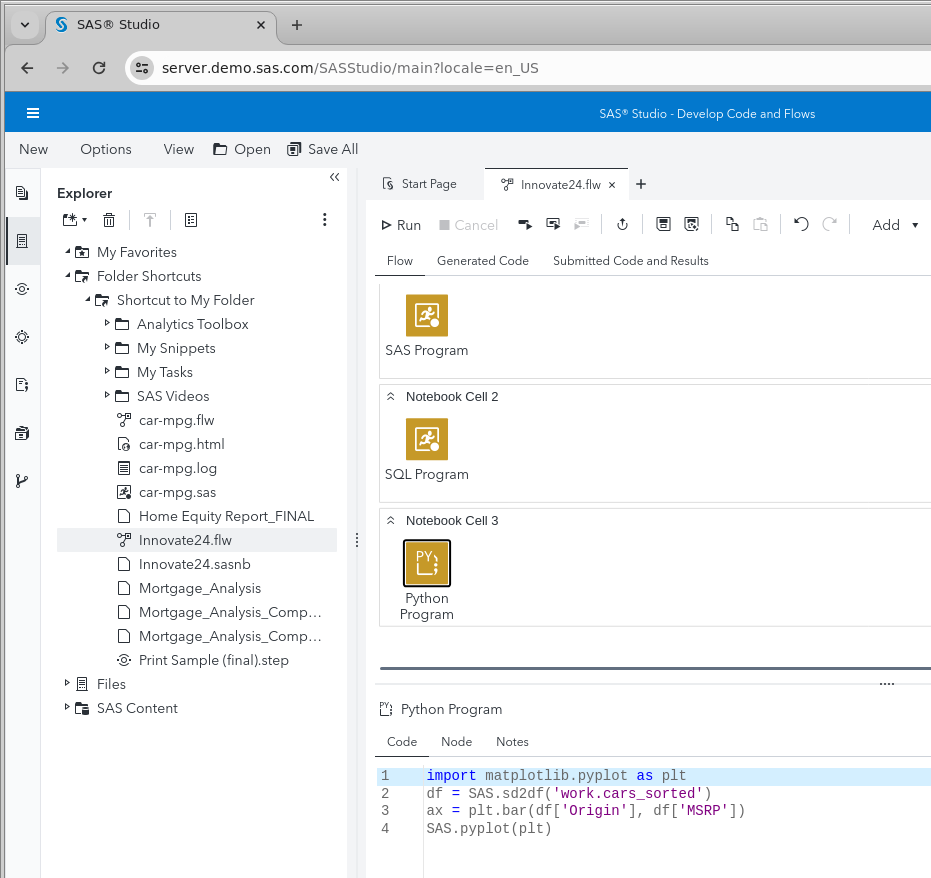
This deep integration between the SAS extension for VS Code and SAS Studio opens the door to additional capabilities. As an example, SAS Notebooks are inherently interactive and cannot ba scheduled or submitted in batch. Once you transform the notebook into a SAS Studio flow, that becomes possible.

This is the (real) end of the exercise.